Blurring or pixelating part of a photo only helps if the hidden detail cannot be recovered or guessed. A blur that looks heavy can still let a licence plate be read, and a box that is a few pixels too small can leave the edge of a sensitive number untouched. We tested the Blur / Pixelate Image tool with a synthetic photo containing a licence plate, a note with an account number and a drawn face, and measured what the exported file really contains. This guide covers how to use the tool, which settings hide text, and what to check before sharing anything sensitive.
How to censor an area, step by step
- Add the photo. Drop it on the upload area or click to browse. It appears in a dark editing frame.
- Mark each area. Drag on an empty part of the image to draw a box. Drag inside a box to move it, drag a corner handle to resize it, and click the red x on a box to delete it. Boxes smaller than 15 pixels (as displayed) are ignored. Clear All Areas removes them all; the counter below the image shows how many are marked.
- Choose Blur or Pixelate and set Intensity (2 to 40, default 18).
- Check the Result Preview. It updates a fraction of a second after every change.
- Click Download Censored Image. The file is always a PNG named
censored-image.png.
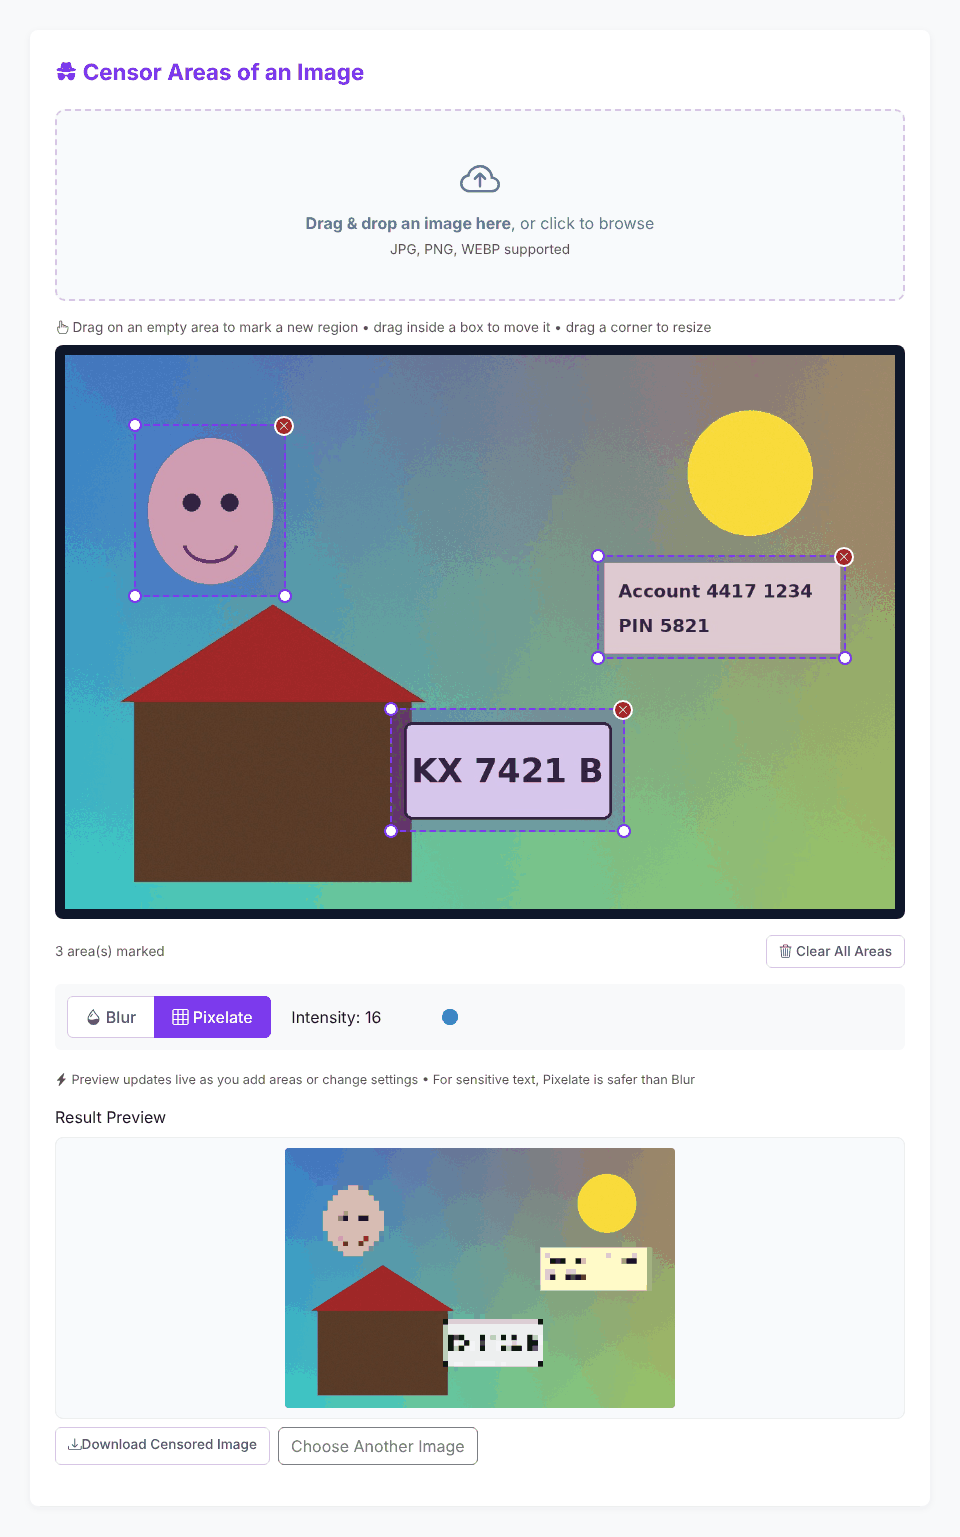
Two behaviours to keep in mind. First, the effect and intensity apply to all boxes together; you cannot blur one box and pixelate another in the same pass. Second, the preview only appears once at least one area is marked. With none marked there is nothing to download.
Blur or pixelate: what each one actually does
Pixelate shrinks the boxed region to a coarse grid and enlarges it back with hard edges, so each block is roughly the colour of that part of the picture (the browser's image scaling does the averaging). The block size equals the intensity value in image pixels, with a minimum of 2. Blur applies a Gaussian blur. Both effects are measured on the original picture, not on the screen (in our tests the censored area in the exported file matched the box we drew to within a pixel or two on a desktop-width window, and a few pixels on a phone-width one). For blur, the radius is the intensity value in image pixels, but the tool raises it when that would be too weak: it multiplies the radius when the photo is shown smaller than its real size (a 4000 px photo in an 830 px frame, for example), and it makes the radius grow with the box, so that at intensity 40 it is at least half of the shorter side of the box. Lower settings scale down proportionally. Pixelate block size is still exactly the intensity value in image pixels, so a large photo of small text can need a higher pixelate intensity than a small photo of the same text.
Even so, pixelate or a solid fill is the safer choice for text, because a mild blur only smears detail while a coarse pixel grid throws it away. The tool says this in a short hint under the preview.
Blur stays blurred up to the edge of the box
The tool blurs a cut-out copy of the area and pastes it back. To stop that copy from fading out towards its own edges (which would let a band of the sharp original show through) the cut-out is extended with its own edge pixels before it is blurred. We checked this with a test image of 4-pixel black and white stripes and a blurred box in the middle. We measured the stripe contrast that remained from the very edge of the box inward, as a share of the original, at intensity 8, 18 and 40: it was at most about 5% everywhere, including the first pixel inside the box. Pixelated areas have hard edges and showed no fade either.
A box drawn exactly around a plate or a word therefore hides it up to the border. It is still good practice to leave a little margin: the box you draw is converted to image pixels and rounded, and in our resize tests the exported censored area differed from the intended box by up to a couple of image pixels (more on a very narrow window, where one screen pixel covers several image pixels).
Text is the case to watch. In our own test the plate characters were about 36 px tall, and blur was the weakest setting for hiding them (the picture below). Judge a blur by looking at the exported file, not the preview alone, and for anything sensitive use Pixelate.
How strong does it need to be?
For the same plate (characters about 36 px tall, box drawn tightly around it, 300 by 140 px), here is what we saw in the exported file:
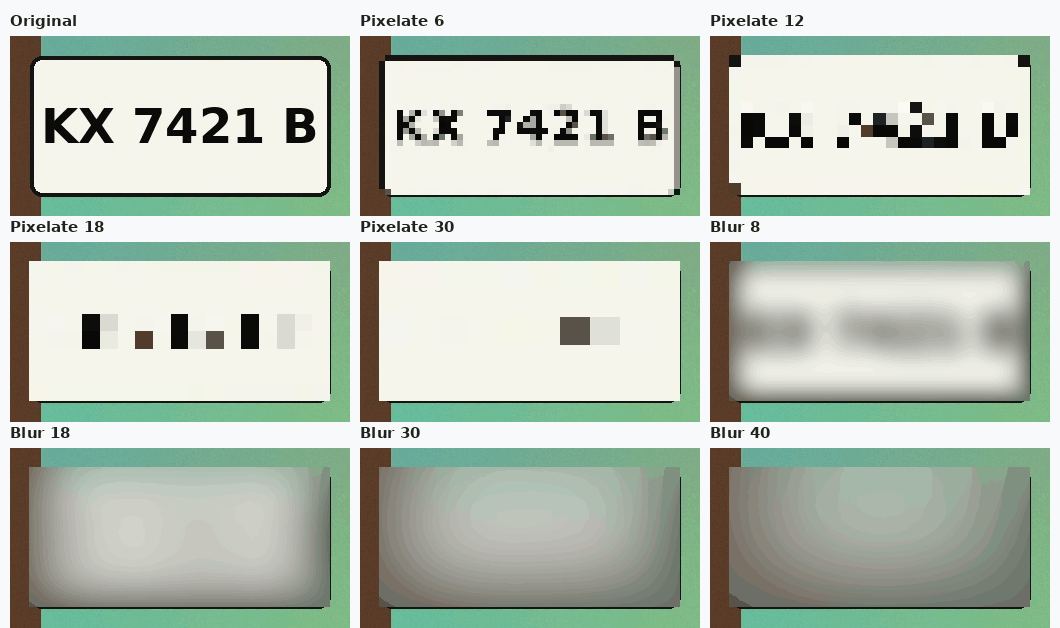
- Pixelate 6: text readable by eye. Useless for hiding anything.
- Pixelate 12: the characters are broken into blocks that a person can still partly guess at. Too weak for a plate or number.
- Pixelate 18 and above: no characters visible; a few dark blocks remain. 18 is about half the character height.
- Blur 8: no characters can be made out, but dark smears show where the text was. Blur 18, 30 and 40: an even grey patch with no characters.
As a cross-check we also ran the open-source OCR program Tesseract. On the plate crops (enlarged 3x) it read the original, and returned nothing usable for blur 18 and above or for pixelate 12 and above. We also tested the text "AB 1234 CD" at character heights of roughly 20 to 70 px on 1600 px wide images and at about 50 and 110 px on 4000 px wide images, each with a box around the text. Tesseract read every original. After blur at the maximum intensity (40) it read none of them, and after blur 18 it read none either. Pixelate 18 returned no usable text on all but the largest sample, where Tesseract still produced partial characters, which shows that a block size small compared with the characters is not enough. A failed OCR run proves little on its own, which is why we also looked at the images. A rule of thumb that matches the pictures: choose a block size at least half as large as the characters you are hiding, and more if the stakes are high. Text is a particularly weak case, because plates, account numbers and PINs come from a limited set of characters. Researchers have published methods that guess or reconstruct obscured text and faces from mild blur or pixelation; we did not test any of them here. If an identification would cause real harm, do not rely on a gentle effect.
Censor your photo now
Open the Blur / Pixelate ToolResizing the window after marking areas
The boxes you draw are kept in step with the picture when the window changes size. We marked the plate, the note and the face with the window 1280 px wide, then narrowed it to 700 px, to 390 px (a phone width), and in another run to 1000 px and then 500 px, and also widened a 600 px window to 1280 px. We also changed the window size before drawing the first box. In every case the area under the box was fully changed in the exported file, and the text outside the box was unchanged apart from a rim of a pixel or two (checked with a separate photo of readable text). In the three-area scene below, the plate, the note and the face were 33%, 35% and 22% changed in the export with the window left alone, and 27%, 34% and 22% after narrowing to 700 px (the plate figure differs a little because the pixel blocks fall on slightly different positions).
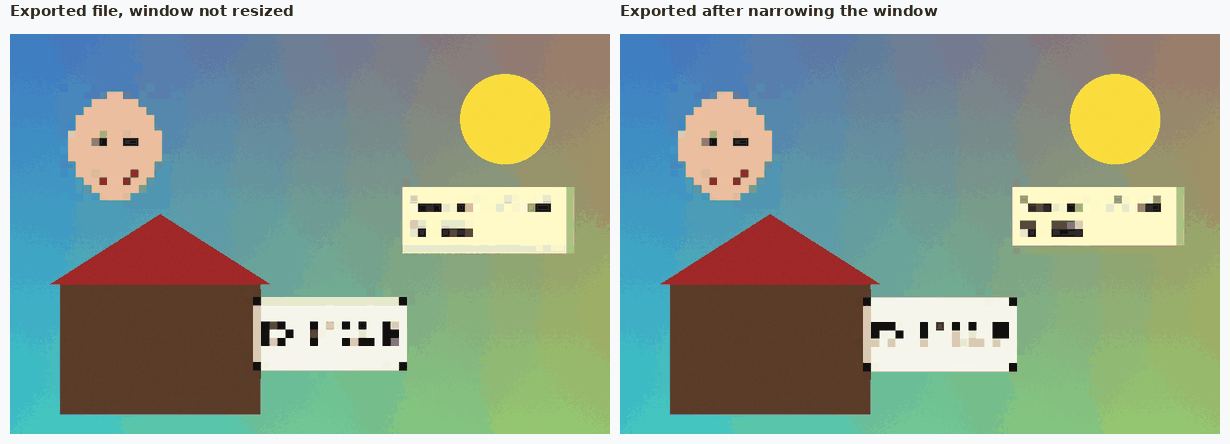
We tested window resizing in a desktop browser, not device rotation on a phone. As with any censoring job, compare the Result Preview with the original before you download, and if anything looks off, clear the areas and draw them again.
What the downloaded file is
- Format and size. Always PNG at the original pixel size (1200 × 800 in, 1200 × 800 out). A 167 KB JPEG became a 1.11 MB PNG in our test. Use the Image Converter or Image Resizer afterwards if you need a smaller file.
- Metadata is not kept. The test JPEG carried EXIF data, including a camera model and GPS coordinates; the PNG that came out had no EXIF, XMP or text chunks. The original file on your device is untouched, so share only the censored copy. To strip metadata from other photos, use the EXIF Data Remover.
- Everything outside your boxes is unchanged. Other identifying details such as a street sign, a reflection in a window or a name tag are not removed unless you box them.
A short checklist before you share
- Zoom into the exported file at 100% and read the censored areas.
- Prefer Pixelate for text, numbers and plates. Use blur mainly for faces in the background, and then with generous boxes.
- Make boxes a little larger than the target: a few pixels of margin for blur, and at least one block for pixelate.
- Look for the same detail somewhere else in the photo: a reflection, a second plate, text on a screen.
- Upload only the censored copy.
Is the photo uploaded?
No image data leaves your browser. The effect is drawn on a canvas by the page's script, and the only network call in the tool's code is the feedback form. We watched the requests while loading a photo, drawing boxes and downloading the result and saw no uploads; the page loads Bootstrap from a CDN and also shows ads, which load their own scripts.
Quick answers
Can I cover an area with a solid black box? There is no solid-fill option. At the maximum pixelate setting (40), a small area collapses to a few large blocks, which is the nearest equivalent. For documents with highly sensitive numbers, an editor with an opaque rectangle is better.
Can I undo the censoring in the exported file? No; the original pixels are replaced in the PNG. But a strong effect is what makes recovery impractical, which is why intensity matters.
Does it work on a phone? The page's code handles touch events for drawing, moving and resizing boxes, though we tested with a mouse only. We did not test rotating the device.
What file types work? Any image your browser can open; JPG, PNG and WEBP are listed. Other files show "Please select a valid image file."
Is blurring someone's face enough for legal or privacy reasons? It depends on the situation and your country; this is not legal advice.
Censor your photo now
Open the Blur / Pixelate Tool